Business- technology - Educational- Politics -Software

Showing posts with label SOFTWARE & IT. Show all posts

Friday, November 29, 2019

Introduction on loops in PowerShell by rkp

PowerShell

 Introduction on loops in PowerShell :

We will always need loops if we have something  repetitive  work ,In loop we run a piece
 of code or any statement on a repetitive basis .One real example ,suppose in a school there
 are 20000 students and because of some reason university decided to give 5 marks extra for
 examinations to every student . So the university has decided to give this 5 marks to every
 student except those whose attendance is less than 100 days . Now you just assume how staff
 will do it , they will have to check every student marks and attendance of the year . But Same
 thing with the help of Any loop it could have been done very easily , by creating an array of
 students with their marks and attendance dates .Here by using loop we are able to save extra efforts .
Types of  loops in PowerShell :
There are many ways to run loop in PowerShell , but it always depends on your requirements and
 feasibility of program ,for example if you want to execute at least once for any array than we should
 use do while loop else there are for loop and foreach which are good.Types and their examples are
 given below.

While

While statement takes a condition as argument and execution of statement inside a while loop depends
 on the condition, that means if condition is success than it will execute statement else not.
Syntax,
while(condition)
{
    Statement 1
    Statement 2
    ….
}
Example ,
$j = 0 
while($j -lt 10)
{
    Write-Output $j
    $j++ }
Below is the screen for above code execution ,

Do While

Do while is similar to while loop only difference is it will execute at least once , that means it will execute do block for the first time and while block if condition is true.In the below syntax do block executed for first time for sure .
  • Do :This block execute for first and once when execution
     starts .
  • while : Execution of statement 1 and statement 2 totally
     depends on the success of condition;
Syntax ,
Do
{
Statement 1
Statement 2
….}while(condition){
Statement 3
Statement 4
…..
}
Example 1,
$j = 0
do
{
    Write-Output $j 
    $j++
}while($j -lt 10)
Example 2,
In this example do block will execute for the first time even condition was not true .

$j = 0
do
{
    Write-Output $j
    $j--
}while($j -gt 0)

Below screen for both programs is is given ,

Do Until

Do until is little different than do while , in do until execution will continue till return negative result
 by “until block”.two things are major here.
  • Do :This block will keep executing until block condition get
     failed , that means until block
    return a negative value .
  • until :Do block statement 1 and statement 2 execute until conditions
    return negative results .

Syntax,


do
{
    Statement 1
    Statement 2
    ….
}until(condition)

Example,

$i = 0

do
{
    Write-Output $i
    $i++
}until($i -ge 5)

In “do until” block we can see execution of do block will continue till “until block”
condition is returning positive value.

For,
The for statement runs a statement list zero or more times based on an initial setting. 
In the below syntax
 of for loop there are three important sections .
  • Initialisation section : In this section it assigned initial value for any variable ,
     this section runs once for the first time .
  • Condition : In condition parts , we write our condition for which loop will run ,
     that means execution of statement block always depends on the success
     of condition parts, if condition is true than statement block will execute else not .
  • Operation : In this block we can increase , decrease or change the value
     of initialize variable or any things according to our requirements .
Syntax,
for($initialisation; condition; operation)

{
    Statement 1
    Statement 2
    ….
}
Example 1,
for($i = 0; $i -lt 3; $i++)
{
    Write-Output $i
}
Output screen of above code ,

Many times one for loop is not enough to complete our requirements , so we can use nested for loops We should try to avoid nesting of loops as their time complexity may go very high if not handled
 properly .Below is an example of nested for loop .
Example 2,
for($j = 0; $j -lt 3; $j++)
{
    $line = ''
    for($j = 0; $j -lt 3; $j++)
    {
        $line += $j.ToString() + $j.ToString() + '  '
    }
    Write-Output $line
}

Output =00  11 22

ForEach

“Foreach” runs statement blocks for consecutive time till last item of an array .Good things about
 forEach statement is ,we do not have to write any seperate code to extract array of items.
In general “foreach” is a optimized version of “for” loop which giving inner item of array without
 writing any programs .Here ,it simply checks for item inside array on which we are running “foreach” loop if any item is there it will execute statement 1 and statement 2 blocks .
Syntax ,
foreach($arrayItems)
{
    Statement 1
    Statement 2
    …..
}
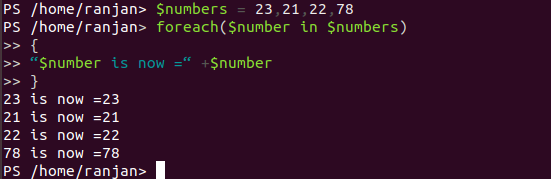
Example ,
$numbers = 23,21,22,78
foreach($number in $numbers)
{
“$number is now =“ +$number
}
Below screen show above executions ,

Benefits of loops in PowerShell :

Biggest benefits of using loop is , it reduces too much manual work also it is very good to control
 big size of data for similar type of activity on it. Let’s say I want you to print 1 to 1000000 and I told
 you that you can add 1 to every number divisible by 2 , which is an even number .
Then if you start printing one by one and try to add 1 to every even number it will take too much time .
 So, a better and easy way you suggested was just repeat this process of adding one to the number until
 we reach 1000000. Biggest benefits we are getting from loop is we are reusing the same piece of code,
 we do not required to write the same code for lakhs of data it will automatically execute code till the end.
Below are few points of benefits
  •  Increase code reusability ,which makes code smaller
  •  Faster calculation for big data , saving a lot of manual labor
  •  Redundancy of code is less.
 
An example with its benefits   , 
Question : print upto 1000 .
Without loop,

Write-Output 1;
Write-Output 2;
Write-Output 3;
Write-Output 4;

…so on
Till 100

With loop,
$x=1..100
foreach($y in $x){
Write-Output $y;
}

Conclusion:
To conclude, So we learned that loops are very powerful tool to utilize the same code with less work.


Git branching strategy and solutions to branch merging issue .

Git common problems and their solutions :

Git strategy

Branching Strategies:
If you want to have a smooth development cycle than you must have a good branching Strategies. A good Branching strategies helps team to develop their codes without any conflicts and while pushing for release  . Changes to the branch don't affect other developers until the developer or team has tested the changes and decides to merge the code. Developers can still pull down changes from other developers to collaborate on features and ensure their private branch doesn’t diverge too far from the main code line. different organizations uses different branching strategies  but there are few very frequent way to do branching , they are given below .
  1. No branching Strategies:In this case there will not be any branch all developers will work on the same central repository and they can merge their branches with central branches after proper testing.This type of strategies mostly followed in smaller team were internal testing is very good and all developers are working in sync .

    For any larger team this strategies will work very well , because if any bug and issue will be there in any merge it will be very hard to fixed it and find the proper solution for it . Many time it take too much time to release a small feature . Any larger team or team which seats globally should avoid this strategies .
  2.  Release Branching: This strategies is most common , in this strategies there will be a release branch taken from live branch that may be master branch , and all developers will work on this branch till next release . Only problem with this branch if scrum go longer than two week than it will be very hard to manage .We should only go with if we have very smaller release and scrum should be of 2 week maximum .
    This strategy is most commonly used in waterfall and Scrummerfall development processes.
  3. Feature Branching:This branching strategies are very good for faster and smoother development cycles . In this every developers makes a branch with name of their feature for example user_name , and once testing done with this branch developer can merge their branches with master branch.Again if proper understanding not maintained during development this strategies can also be go like Release branching , if time for release go very longer and changes are getting bigger and bigger.
  4. Story or Task Branching:In this every branch is associated with a task on id , which means managers can divide story into multiple branches and can with associate each branch with some task of any big story.In this strategies managers can release very frequently as he can divide task into smallest part and can assign this task to some branch . These branches are completely independent of other task so can be independently releases .
 Merging Strategies
  1. Merging is very important in git , as many time because of code conflict features did not reflect properly and testers keep blaming , and this could lead to delay in already developed features .merging can be done by mutual code review .Many organization try to make more and more repose and smaller code as in such situations there are very less possibility for code conflict .In some cases developers keep updating their work within the team  so that others will aware of upcoming conflict.

  2. Some basic tricks to merge branches and code:
    1.  Suppose there are many commits  on the branch which we are planning to merge and many of the commits are not clear .
      Solution .we can use cherry pick also in cherry pick we go to the git commit logs and select the the commit id’s and merge those id’s with with branch.
      Let's take an example,
      Master branch =>master
      Feature branch=>feature_branch
      Git checkout feature_branch
      git log --author="Jon"
      Log1_id
      Log2_id
      Log3_id
      Here we are looking at each commit of user Jon and we can ask him to which commit need to go live and which one not .
      Next things we need to do cherry-pick
      git checkout master
      Git cherry-pick Log1_id
      Git cherry_pick Log2_id
      And here we have merged two logs.

Monday, November 25, 2019

What is site map and how sitemap works in Websites. Basics?

Introduction :


Site map is a very important things for any websites .If any one of you want to see how it looks like go to any website(amazon ,flipcart etc) and check for the URLS https://www.xyz.com/robots.txt , here you can write amazon ,flip cart instead of xyz etc . So basically Site map is very important and powerful software technology for any search engine .A sitemap is a XML file placed on your website in which we mansion about various pages of our websites, generally those pages which are mostly search by customer . So for example if your website is www.xyz.com and you are selling books with different different categories than there could be multiple URLs like www.xyz.com/book-english.html, www.xyz.com/book-rs+100-hindi.html  So all these URLs need to be mansion inside sitemap.xml file .Here indexed means informing search engine (google or yahoo) about our website pages ,so that they get easily searched. Search engines use sitemaps to understand our site and its architecture, while web users can utilize them to quickly find specific pages on your site.example of any sitemap is given blow sitemap.xml which holds urls like www.xyz.com/book-english.html,www.xyz.com/book-rs+100-hindi.html etc.

Why we need Site map? 
If you are running any online eCommerce or any educational or anything which is made for public uses than you need to have better sitemap. Because same business is run by other people and is some customer search for any product than if you have better sitemap indexing than there are very huge possibility for your product get sells .
So simply if you want to increase your chances to get more customer you need to have better site map and indexing .
How Site map Works?
By writing sitemap.XML file we are allowing webmaster to inform search engine(google and yahoo) about URLs on the website that are available for crawling .In very simple word a site map is a XML fie which contains all index-able URLs for the site .This allow search engine to understand how important URLs and hoe frequently these URLs get changed . You can see site map for any website on www.xyz.com/robots.txt file .

One important point, writing sitemap.xml and putting our URLs here does not means indexing done , here we are just giving little clue to google about our important and good quality pages so that google will find it easy to reveal to customers.

Saturday, November 23, 2019

Power Shell introduction and if condition lesson 1.

PowerShell
Introduction : PowerShell is a way to write Administrative commands on Windows environments , it is similar to bash scripting in Linux .It provides a way to automate the Windows operating system and its applications to deal with various tasks .PowerShell is available for both Windows and Linux operating systems, but in this tutorial we are focusing toward windows . In the below image we can see how Powershell controls all Automation works.

if statement in PowerShell

Introduction: The if statement allows the programmer to control the flow of execution of program ,”IF” statement defines if a program has to execute a section of code or not , based on whether a given condition expression is correct or not .Here correct in programming terms  true or false. One of the main uses of if statement it allow program to take decision on the basis of one or more conditions. An if statement is based on the boolean value , if the boolean condition value is true than inside the if block and execute the lines of statements inside if block .In another simple word , To execute any statements  it has to test one or multiple conditions if conditions are true it will execute the statement . “If” statement needed when we wanted to check any specific case.
Syntax : 
Syntax of if in PowerShell is very much similar to other programming languages . It checks for condition ,if the condition expression is true it will got to if block , if the condition expression is false it will go to else .

if(condition) {

   // Executes when the condition is true

}else {

   // Executes when the condition is false

}

We can also use elseif , syntax below.

if(condition 1) {

   // Executes when the condition 1 is true

}elseif(condition 2) {

   // Executes when the condition 2 is true

}elseif(condition 3) {

   // Executes when the condition 3 is true

}else {

   // Executes none of the condition is true.

}

Flow diagram : 
In the below flow diagram we can see when execution start , it first checks condition if condition is true than it will go to statement block .Here conditions can be one or multiple . Any condition other than zero , false , blank are considered as true only .for example if any conditional expression gives output of 0,”” , false all these are considered as false statements .


How if statement in PowerShell:
if (<cond1>)

    {<statement1>}

[elseif (<cond2>)

    {<statement2>}]

[else

    {<statement3>}]
Here, when it starts execution it checks for cond1 as if  it is true or false , based on the value it will execute the statement block , if cond1 is true it will execute statement1 and PowerShell exit. But if cond1 is false , then it will check else if block cond2 ,if cond2 is true than statement2 will be executed .If cond1 and cond2 both are false or none of condition is true than else statement will be executed .

Condition can be one or multiple, for example .
if (<condition 1 -or condition 2>)

    {<statement1>}

[elseif (<condition 3 -or condition 4>)

    {<statement2>}]

[else

    {<statement3>}]

Examples :
Simple if else example,
$x = 40

if($x -le 20){

write-host("value of x is not less than 20")

}else{

write-host(“value of x is greater than 20”)

}


Output:  value of x is greater than 20

Explanation : Above code is checking the value of $x , if it is less than 20 or not , if value of $x is less than 20 it will execute if statement block .

Example with Multiple conditions ,

$day = (get-date).dayofweek

if(($day -ne "Saturday") -or ($day -ne "Sunday")){

write-host("Welcome to Our Banks")

}else{

write-host(“Hello friends , Banks are closed today”)

}

Explanation : Above code will print output according to day .Here -ne matches case the value of $day , so if day is Sunday or Saturday , it will print  "Hello friends , Banks are closed today" and if it’s other than Sunday and Saturday it will print “Welcome to Our Banks”.
Example with if else if conditions ,
$occupation =”engineering”

if($occupation -eq "engineering"){

write-host("engineer")

}elseif($occupation -eq "sales"){

write-host("sales")

}else{

write-host("accounting")

}

Explanation: In the above code it checks for $occupation value , if it is equal to engineering than print engineering ,if value if $occupation is sales than it will print sales, and if $occupation is none than it will print accounting.

functional based example,

 function check ($VALUE) {

 if ($VALUE) {

     Write-Host(“TRUE”)

 } else {

     Write-Host(“FALSE”)

 }

 }

Calling function ,
check $FALSE

FALSE

check TRUE //TRUE is a string length >0

TRUE

check FALSE //FALSE is a String with length > 0.

TRUE

NOTE:In PowerShell String with length more than zero is considered as true .

Explanation : In the above example first it calls for check function with parameter  $TRUE , and inside function check , it checks for $VALUE and if it is true it will print TRUE , in similar way again check called with parameter $FALSE and it check $VALUE and as it is false it will go to the else block .

With the above example we are clear that if statement can play a very crucial role in real software world .
Conclusion
PowerShell IF is a very powerful tool to handle conditional statements ,I hope I was able to simplify IF in PowerShell.


Tuesday, November 12, 2019

How Elasticsearch works and basics .

Elastic Search Basic

 Introduction : Elasticsearch is a real-time distributed and open source full-text search and analytics engine. It is accessible from Restful web service interface and uses schema less JSON (JavaScript Object Notation) documents to store data. It is built on Java programming language and hence Elasticsearch can run on different platforms. It enables users to explore very large amount of data at very high speed.
Advantages of Elasticsearch 
  1. BUILT ON TOP OF LUCIENNE – Being built on top of Lucienne, it offers the most powerful full-text search capabilities.It makes it very faster also.
  2. DOCUMENT-ORIENTED – It stores complex entities as structured JSON documents and indexes all fields by default, providing a higher performance.
  3. SCHEMA FREE – It stores a large quantity of semi-structured (JSON) data in a distributed fashion. It also attempts to detect the data structure, index the data present and makes it search-friendly.
  4. FULL TEXT SEARCH – Elasticsearch performs linguistic searches against documents and returns the documents that matches the search condition. Result relevancy for the given query is calculated using TF/IDF algorithm.
  5. FULL TEXT SEARCH – Elasticsearch performs linguistic searches against documents and returns the documents that matches the search condition. Result relevancy for the given query is calculated using TF/IDF algorithm.
  6. RESTFUL API – Elasticsearch supports REST API which is light-weight protocol. We can query Elasticsearch using the REST API with Chrome plug-in Sense. Sense provides a simple user interface. Sense plugin has features like autocomplete Elasticsearch query syntax, copying the query as cURL command. 
Terminologies : 

  1.  Cluster: A cluster is a collection of nodes that shares data.
  2.  Node: A node is a single server that is part of the cluster, stores the data, and participates in the cluster’s indexing and search capabilities.
  3. Index: An index is a collection of documents with similar characteristics. An index is more equivalent to a schema in RDBMS. 
  4. Type: There can be multiple types within an index. For example, an ecommerce application can have used products in one type and new products in another type of the same index. One index can have multiple types as multiple tables in one database.
  5. Document: A document is a basic unit of information that can be indexed. It is like a row in a table.
  6. Shards and Replicas: Elastic Search indexes are divided into multiple pieces called shards, which allows the index to scale horizontally. Elastic Search also allows us to make copies of index shards, which are called replicas.

Usecases :

Ecommerce websites use elasticsearch to index their entire product catalog and inventory with all the product attributes with which the end user can search against.
So whenever a user search for a product in the website, the corresponding query will hit an index which has millions of products and it will retrieve the product in near real time.
You want to collect log or transaction data and want to analyze and mine this data to look for statistics, summarizations, or anomalies.
In this case, you can index this data into Elasticsearch. Once the data is in Elasticsearch, we can visualize the data in timelion/d3.js to better understand the collected logs.
Installation :
Let’s assume that you are in a Linux based environment. Assuming that you also have JDK 6 or above installed, let’s get on with downloading Elasticsearch using the command below:
Then extract it.
tar -zxvf elasticsearch-5.4.0.tar.gz
Go to the folder where Elasticsearch has been installed.
cd elasticsearch-5.4.0
To start the Elasticsearch server,
bin/elasticsearch
You can access it at http://localhost:9200 on your web browser. Here, localhost denotes the host (server) and the default port of Elasticsearch is 9200.
To confirm everything is working fine, type http://localhost:9200 in your browser and you should see something like this.
{
“name” : “90AzDAw”,
“cluster_name” : “elasticsearch”,
“cluster_uuid” : “e6t_hv6eQCi280elcktrUQ”,
“version” : {
“number” : “5.4.0”,
“build_hash” : “780f8c4”,
“build_date” : “2017-04-28T17:43:27.229Z”,
“build_snapshot” : false,
“lucene_version” : “6.5.0”
},
“tagline” : “You Know, for Search”
}

Indexing Documents :
Elasticsearch tends to use Lucene indexes to store & retrieve data. Adding ‘data’ to Elasticsearch is known as “indexing.” While performing an indexing operation, Elasticsearch converts raw data into its internal documents. Each document is nothing but a mere set of correlating keys and values: Here, the keys are strings and the values would be one of the numerous data types such as strings, numbers, lists, and dates, etc.
We can query Elasticsearch using the methods mentioned below :
-cURL command
-Using an HTTP client
-Querying with the JSON DSL
ElasticSearch provides a REST API that we can interact with in a variety of ways through common HTTP methods like GET, POST, PUT, DELETE. Which does the same thing as the CRUD operations does.
Now, let’s try indexing some data in our Elasticsearch instance.
Insertin Documents :
curl -XPUT http://localhost:9200/patient/ou... -d’
{
“name” : “Ranjan”,
“City” : “Kumar”,
"age" : 30,
"Address":"Chennai"
}’
This command will insert the JSON document into an index named ‘patient‘ with the type named ‘outpatient‘. 1 is the ID here. If we didn’t provide any ID here, it will simply create one for you. Pretty is used to pretty print the JSON response. To replace an existing document with an updated data, we just PUT it again.
By using the above method, we can insert one document at a time.
In order to bulk load the data, we can use Bulk API of Elasticsearch.
curl -XPOST ‘localhost:9200/patient/outpatient/_bulk?pretty&refresh’ –data-binary “@/home/ubuntu/Ex.json”
The above command loads the data.json file into the patient index.
Retrieving a Document :
Retrieving a Document in a index can be done using GET request.
curl -XGET ‘localhost:9200/patient/outpatient/1?pretty’
The response of this command contains the resulting JSON document under the _source field.
{
“_index” : “patient”,
“_type” : “outpatient”,
“_id” : “1”,
“_version” : 1,
“found” : true,
“_source” : {
“name” : “John”,
“City” : “California”
}
}
It returns the document with the id 1 and some metadata about the document.
Deleting a Document:
This API allows us to delete a JSON document from an index.
curl -XDELETE ‘localhost:9200/patient/outpatient/1?pretty’
This command deletes the JSON document with the id 1.
In order to delete a document that matches a specific condition we can use _delete_by_query API.
curl -XPOST ‘localhost:9200/patient/_delete_by_query?pretty’ -H ‘Content-Type: application/json’ -d’
{
“query”: {
“match”: { “city”: “California” }
}
}’


Wednesday, May 15, 2019

Understanding V8 engine of Javascript or Node Js for client(Chrome Browser) and server.


Node/Javascript v8 engine
Hello friends , how are you ? In our Node JS part one we learn what is Node Js .  So today we are going to understand node Js V8 engine . V8 engine was developed by google in Germany ,It is developed using c++ ,V8 engine is a open source and mainly made for Chrome browser  at client side but now it has implemented on server . V8 engine was designed to increase performance of Javascript inside web browser .To increase performance of javascript inside browser , V8 engine directly convert javascript into more efficient machine code instead of using any interpreter. It using JIT compiler to compile javascript machine code at the time of execution . Other engines like SpiderMonkey or Rhino (Mozilla)  are also doing the same things but only difference  V8 engine does not produce any bytecode or any intermediate code which makes V8 engine faster . A question may be running in your mind that is it important to know V8 engine ,but my answer will be it will help you to write better and optimised code .JavaScript is a prototype-based language ,so there are no classes and objects ,and classes and objects are created by using a cloning process. JavaScript is also dynamically typed, dynamic means, All variables are dynamic , and even the code is dynamic. You can create new variables at runtime, and the type of variables is determined at runtime. You can create new functions at any time, or replace existing functions. When used in a browser, code is added when more script files are loaded, and you can load more files any time you like. and type informations are not explicit and properties can be added to and deleted from objects on the fly. Accessing types and properties effectively makes a first big challenge for V8. Instead of using a dictionary-like data structure for storing object properties and doing a dynamic lookup to resolve the property location (like most JavaScript engines do), V8 creates hidden classes, at runtime, in order to have an internal representation of the type system and to improve the property access time.V8 can compile to x86, ARM or MIPS instruction set architectures in both their 32- and 64-bit editions; as well, it has been ported to PowerPC and IBM s390 for use in servers.simply V8 convert directly native machine code rather than following traditional technique to convert code into bytecode and than interpret that code to machine code all these things always took some more time which was resolved by v8 engine .v8 engine has one main thread which do the job of fetching the code and compiling it and execute it .There’s also a separate thread for compiling, so that the main thread can keep executing while the former is optimising the code.the concept here is of Hidden class in v8 engine, let's understand hidden class concept of V8 engine.
Hidden class:


function Test(a, b) {
    this.a = a;
    this.b = b;
}
var t1 = new Test(1, 2);
Here V8 is adding a hidden class to keep track and also keep updating this hidden class on any changes into the class properties

here Once the “new Point(1, 2)” invocation happens, V8 will create a hidden class called “Po”.again when next time any changes happen V8 will update this class with another gidden class with name Po2 .
There must be a question coming in your mind that , why we need this hidden class in V8 engine .
There must be a question coming in your mind that , why we need this hidden class in V8 engine . As we have already mention Javascript is a dynamic programming , it means properties type and properties can be changes on run time , it means data stored in memories is not contiguous , so finding fetching something take always longer as compare to Java , because in Java properties are defined before compilation , which means memory allocation is contiguous . And finding from contiguous memory is faster . So V8 engine introduced hidden class concept .On each update in class properties , v8 attaching a updated hidden class , so that at run time it can keep track of properties types .Inline Caching, V8 maintains a cache of the type of objects that were passed as a parameter in recent method calls, and uses that information to make an assumption about the type of object that will be passed as a parameter in the future. If V8 is able to make a good assumption about the type of object that will be passed to a method, it can bypass the process of figuring out how to access the objects properties, and instead use the stored information from previous lookups to the objects hidden class.