PowerShell
Introduction on loops in PowerShell :
We will always need loops if we have something repetitive work ,In loop we run a piece
of code or any statement on a repetitive basis .One real example ,suppose in a school there
are 20000 students and because of some reason university decided to give 5 marks extra for
examinations to every student . So the university has decided to give this 5 marks to every
student except those whose attendance is less than 100 days . Now you just assume how staff
will do it , they will have to check every student marks and attendance of the year . But Same
thing with the help of Any loop it could have been done very easily , by creating an array of
students with their marks and attendance dates .Here by using loop we are able to save extra efforts .
Types of loops in PowerShell :
There are many ways to run loop in PowerShell , but it always depends on your requirements and
feasibility of program ,for example if you want to execute at least once for any array than we should
use do while loop else there are for loop and foreach which are good.Types and their examples are
given below.
feasibility of program ,for example if you want to execute at least once for any array than we should
use do while loop else there are for loop and foreach which are good.Types and their examples are
given below.
While
While statement takes a condition as argument and execution of statement inside a while loop depends
on the condition, that means if condition is success than it will execute statement else not.
on the condition, that means if condition is success than it will execute statement else not.
Syntax,
while(condition)
{
Statement 1
Statement 2
….
}
Example ,
$j = 0
while($j -lt 10)
{
Write-Output $j
$j++ }
Below is the screen for above code execution ,

Do While
Do while is similar to while loop only difference is it will execute at least once , that means it will execute do block for the first time and while block if condition is true.In the below syntax do block executed for first time for sure .
- Do :This block execute for first and once when execution
starts . - while : Execution of statement 1 and statement 2 totally
depends on the success of condition;
Syntax ,
Do
{
Statement 1
Statement 2
….}while(condition){
Statement 3
Statement 4
…..
}
Example 1,
$j = 0
do
{
Write-Output $j
$j++
}while($j -lt 10)
Example 2,
In this example do block will execute for the first time even condition was not true .
$j = 0
do
{
Write-Output $j
$j--
}while($j -gt 0)
Below screen for both programs is is given ,

Do Until
Do until is little different than do while , in do until execution will continue till return negative result
by “until block”.two things are major here.
by “until block”.two things are major here.
- Do :This block will keep executing until block condition get
failed , that means until block
return a negative value . - until :Do block statement 1 and statement 2 execute until conditions
return negative results .
Syntax,
do
{
Statement 1
Statement 2
….
}until(condition)
Example,
$i = 0
do
{
Write-Output $i
$i++
}until($i -ge 5)
In “do until” block we can see execution of do block will continue till “until block”
condition is returning positive value.
condition is returning positive value.

For,
The for statement runs a statement list zero or more times based on an initial setting.
In the below syntax
of for loop there are three important sections .
of for loop there are three important sections .
- Initialisation section : In this section it assigned initial value for any variable ,
this section runs once for the first time . - Condition : In condition parts , we write our condition for which loop will run ,
that means execution of statement block always depends on the success
of condition parts, if condition is true than statement block will execute else not . - Operation : In this block we can increase , decrease or change the value
of initialize variable or any things according to our requirements .
Syntax,
for($initialisation; condition; operation){
Statement 1
Statement 2
….
}
Example 1,
for($i = 0; $i -lt 3; $i++){
Write-Output $i
}
Output screen of above code ,

Many times one for loop is not enough to complete our requirements , so we can use nested for loops We should try to avoid nesting of loops as their time complexity may go very high if not handled
properly .Below is an example of nested for loop .
properly .Below is an example of nested for loop .
Example 2,
for($j = 0; $j -lt 3; $j++){
$line = ''
for($j = 0; $j -lt 3; $j++)
{
$line += $j.ToString() + $j.ToString() + ' '
}
Write-Output $line
}
Output =00 11 22

ForEach
“Foreach” runs statement blocks for consecutive time till last item of an array .Good things about
forEach statement is ,we do not have to write any seperate code to extract array of items.
In general “foreach” is a optimized version of “for” loop which giving inner item of array without
writing any programs .Here ,it simply checks for item inside array on which we are running “foreach” loop if any item is there it will execute statement 1 and statement 2 blocks .
Syntax ,
foreach($arrayItems)
{
Statement 1
Statement 2
…..
}
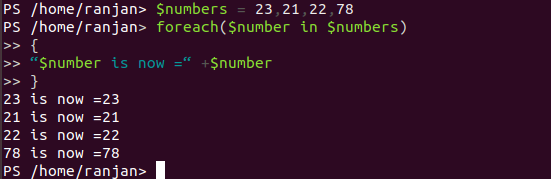
Example ,
$numbers = 23,21,22,78foreach($number in $numbers)
{
“$number is now =“ +$number
}
Below screen show above executions ,
Benefits of loops in PowerShell :
Biggest benefits of using loop is , it reduces too much manual work also it is very good to control
big size of data for similar type of activity on it. Let’s say I want you to print 1 to 1000000 and I told
you that you can add 1 to every number divisible by 2 , which is an even number .
Then if you start printing one by one and try to add 1 to every even number it will take too much time .
So, a better and easy way you suggested was just repeat this process of adding one to the number until
we reach 1000000. Biggest benefits we are getting from loop is we are reusing the same piece of code,
we do not required to write the same code for lakhs of data it will automatically execute code till the end.
Below are few points of benefits
- Increase code reusability ,which makes code smaller
- Faster calculation for big data , saving a lot of manual labor
- Redundancy of code is less.
An example with its benefits ,
Question : print upto 1000 .
Without loop,
Write-Output 1;
Write-Output 2;
Write-Output 3;
Write-Output 4;
…so on
Till 100
With loop,
$x=1..100
foreach($y in $x){
Write-Output $y;
}

Conclusion:
To conclude, So we learned that loops are very powerful tool to utilize the same code with less work.


